(11.2) How to Create a Shipment – How to Send Products to Amazon’s Warehouse

How to Create a Shipment – How to Send Products to Amazon’s Warehouse
Eazyppc welcomes you to the lesson ‘How to Create a Product Label’ – you should read and thoroughly understand the previous lessons, as Eazyppc uses terms and concepts that were explained in earlier posts.
(This guide applies when the Seller and Supplier arrange their own shipping to Amazon’s warehouse — if the Seller uses Amazon’s Send To Amazon service, refer to this link)
Just like creating an Item Label for each individual product unit, Sellers also need to understand the Shipment creation process to ensure a smooth shipping experience, guarantee that goods arrive as planned, and avoid unexpected costs.
(!) If the Seller applies the wrong barcode on a product or carton box -> costly issues will arise. If Amazon delivers the wrong product due to a mislabeled barcode, the customer will not receive the item they ordered. This not only leads to returns and additional return processing fees, negative customer reviews, and more. Furthermore, to fix the mistake, the Seller may need to request a removal order from Amazon’s warehouse to inspect and re-label all barcodes — which again incurs additional costs. For seasonal products, this could mean missing the entire selling season.
Therefore, to ensure a smooth shipment process to Amazon’s warehouse, Sellers should carefully verify barcodes before shipping. In particular, when working with a remote supplier, Sellers should proactively communicate specific barcode requirements clearly, and request that the supplier provide photos of the products and barcodes for a final (few) check(s) before shipping to the US. This helps minimize misunderstandings and ensures a smooth operational flow.
Shipment Label — the shipping label/barcode. Sellers must ensure:
- It is applied to each individual carton box sent to Amazon’s warehouse.
- Applied to the correct box -> Amazon warehouse staff can scan, identify, and process the products from the moment they arrive at the warehouse until they are delivered to the customer.
- A shipment label looks like this:
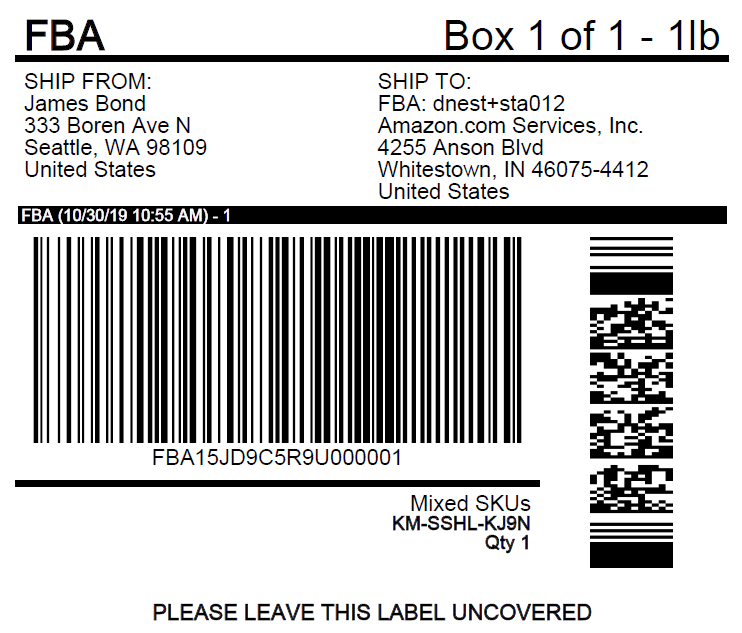
- For other requirements such as label dimensions, application method, etc., Sellers can check here.
The Shipment Creation Process and Key Points to Note:
0/ Before creating a Shipment, the Seller must gather the following information from the Supplier:
- Product dimensions / weight
- Carton box dimensions / weight
- How many units fit per carton box
- Which carrier will be used (FedEx / UPS / …)
- Shipping method to the US (Ocean / Air)
- Ship date (start of shipping)
- Estimated arrival date
- Warehouse address the shipment is sent from
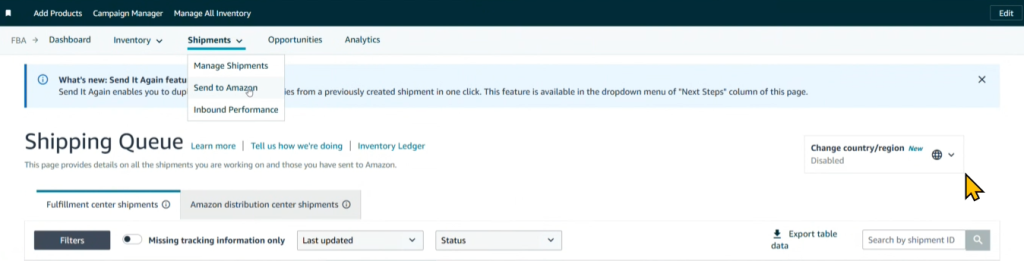
1/ Access the Shipment creation page
Seller Central > Inventory > FBA Inventory > Shipment > Send to Amazon
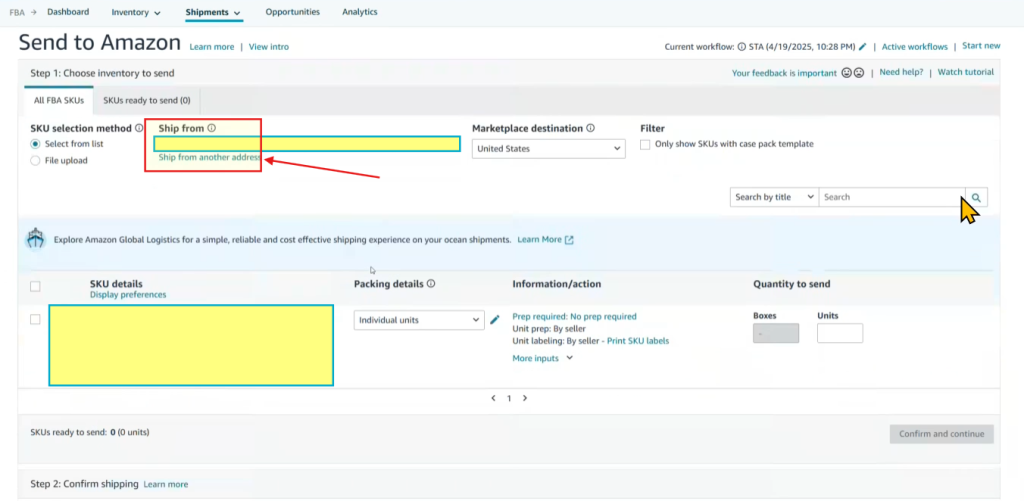
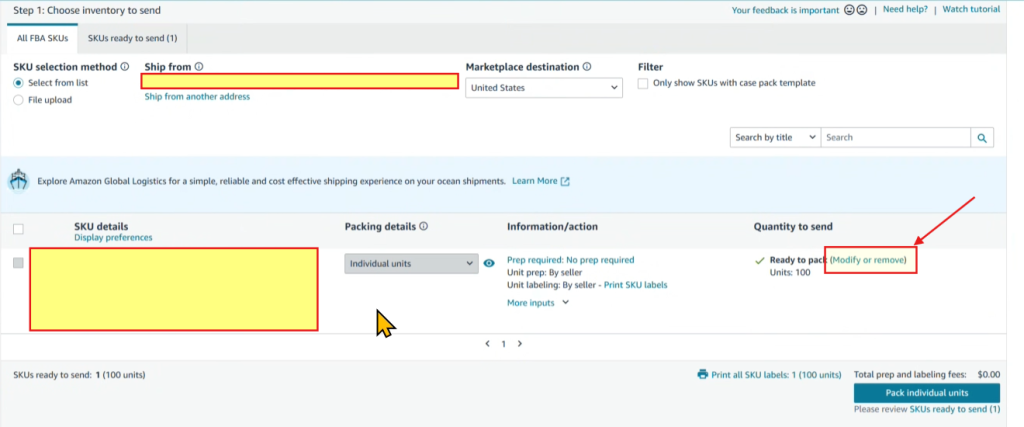
2/ Enter (8) the warehouse address the shipment is sent from:
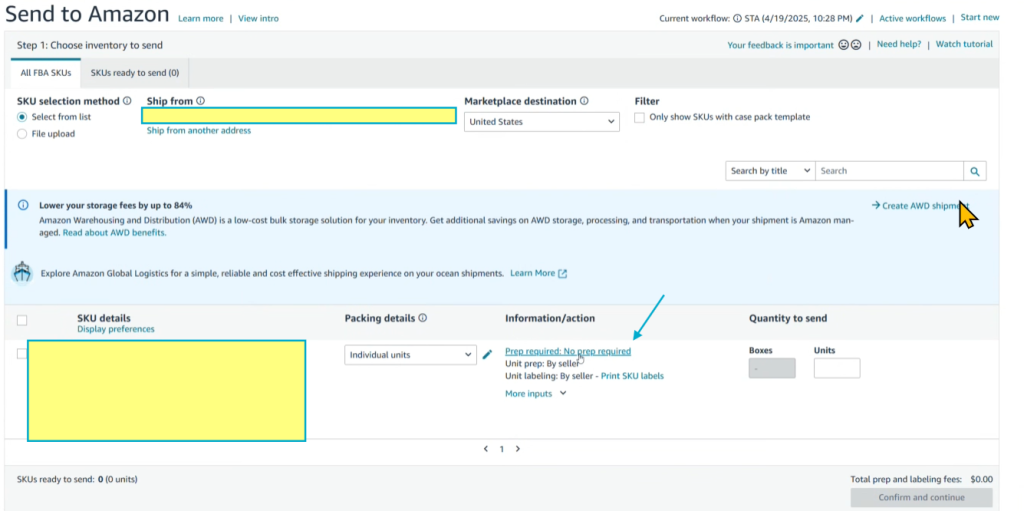
3/ Set Prep Required to NO:
- This tells Amazon that no prep work, packaging, or product labeling is needed on Amazon’s end.
- Amazon only needs to shelve the products and ship them to customers.
- Make sure you have followed Eazyppc’s Item Label creation guide correctly.

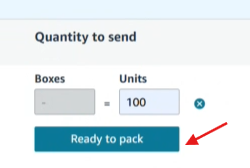
4/ Enter the number of units to ship:
- Note: Sellers should enter the exact quantity matching the number of Item Labels created.
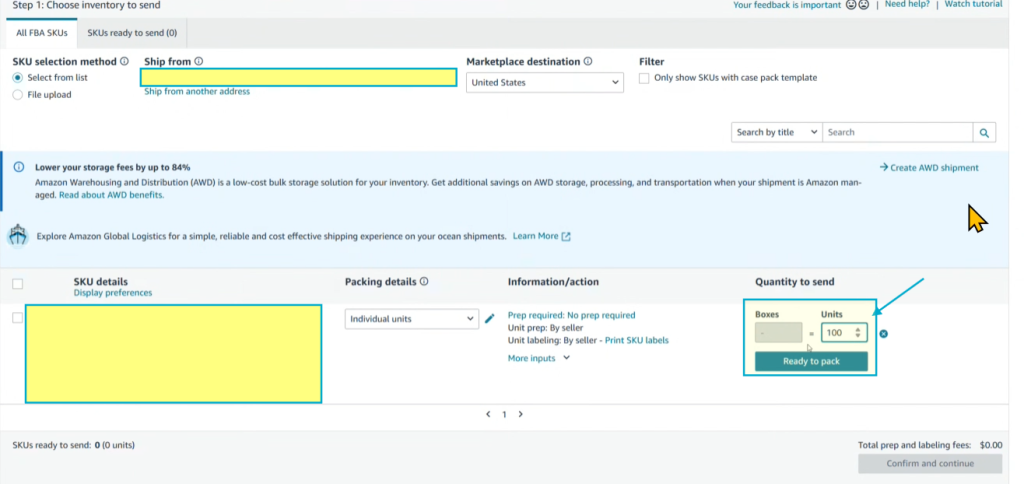
5/ Enter the corresponding number of carton boxes
- The Seller needs to get information on (3) How many units fit per carton box from the Supplier:
- 2 available options:
- 1 single box — containing all units
- >1 box
- 2 available options:
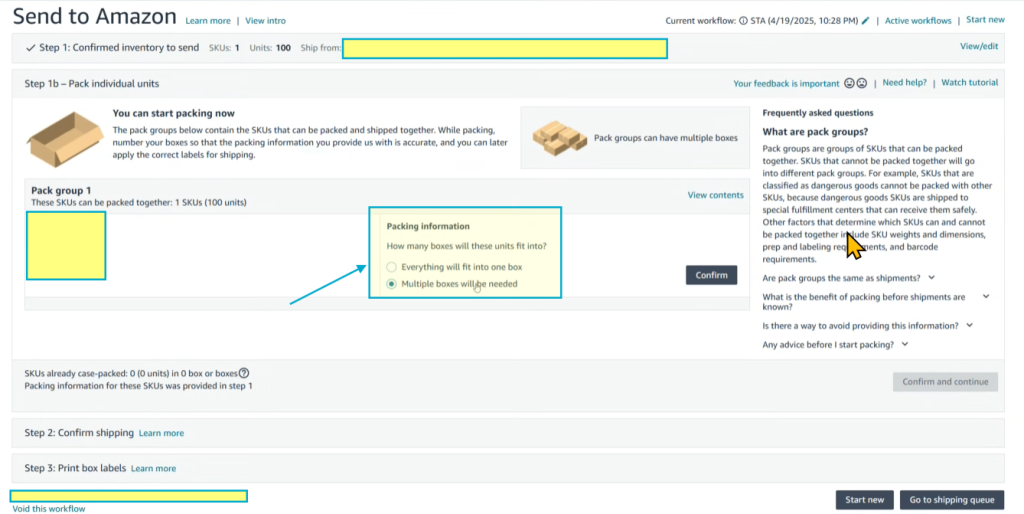
- Enter the specific number of boxes — (3) How many units fit per carton box
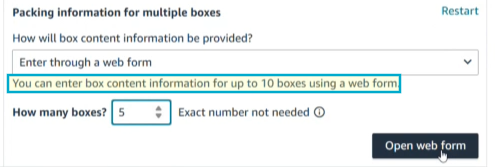
- For <=10 boxes, Sellers can enter the information directly in Seller Central
- For >10 boxes, Sellers need to upload the information via an Excel file
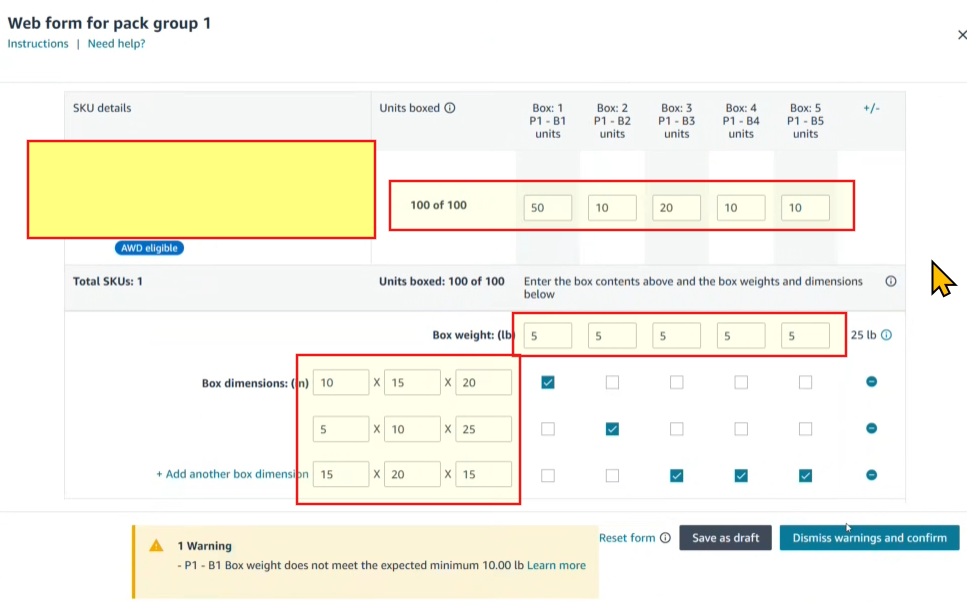
6/ Enter box weight and dimensions:
- Get information from the Supplier:
-
- Product dimensions / weight
- Carton box dimensions / weight
- Example shown in the screenshot below (sample figures, not real values):
- 5 boxes total; units in box 1 = 50, box 2 = 10, …
- Box weight — weight of each box: 5 (must not exceed 50 lbs / box)
- Box dimension — dimensions of each box (must not exceed 25 x 25 x 25 inches)
- Boxes 1 and 2 have their own individual dimensions
- Boxes 3, 4, and 5 share the same dimensions
7/ Select shipping method and ship date:
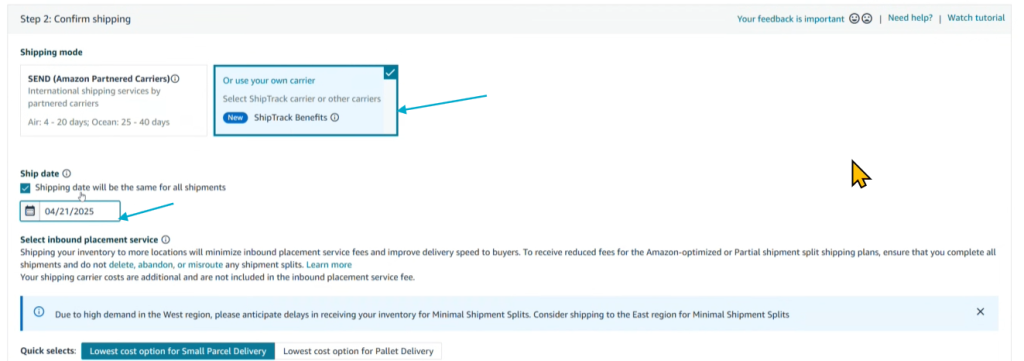
- Note: select Or use your own carriers -> the Seller & Supplier handle shipping themselves. If SEND is selected, the Seller should contact AGS for support.
- Ship date — (6) Start of shipping date
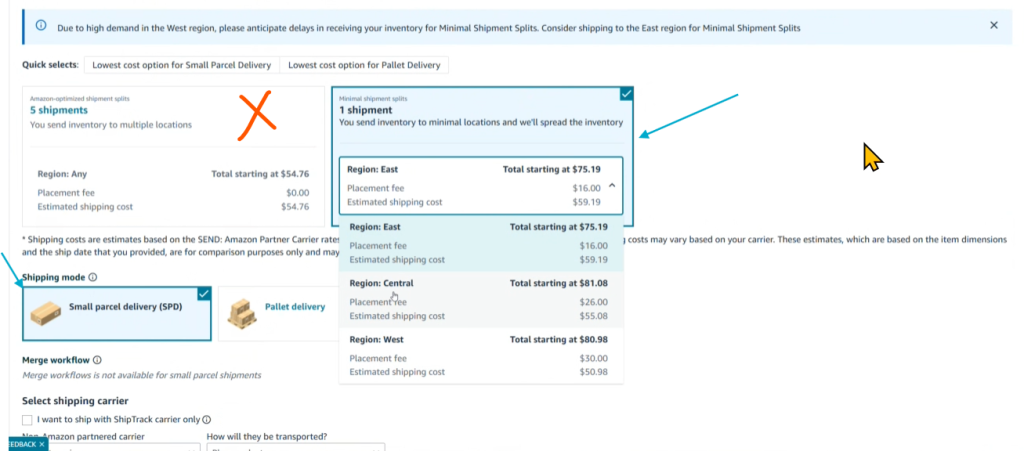
8/ Select destination coast, shipment type, and calculate costs:
- X Shipments -> Carton boxes are split across multiple warehouses -> domestic US shipping costs to each Amazon warehouse will increase significantly -> Sellers should avoid this option
- 1 Shipment -> All carton boxes are sent to 1 warehouse -> US domestic shipping cost to Amazon’s warehouse is lower -> Sellers should choose this option
- Shipping mode: SPD -> small parcel delivery shipping type
- Estimated shipping cost is the projected cost when using Amazon’s SEND program -> no need to calculate this
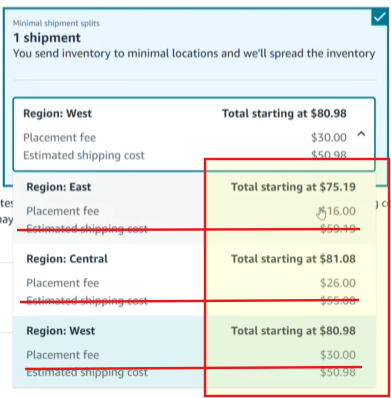
- Sellers should take the Placement fee (i.e., the FBA inbound placement service fee) and add the shipping cost to each coast provided by the Supplier to compare which coast option is cheaper.
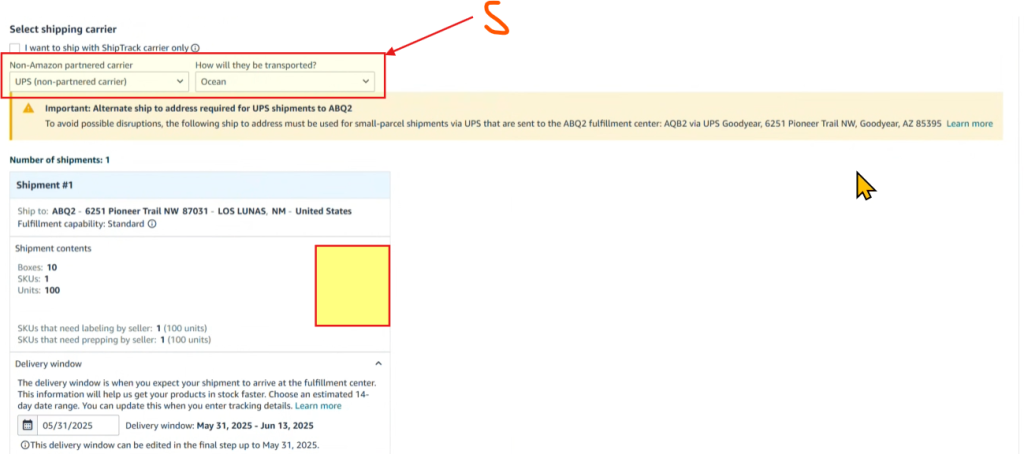
9/ Select shipping route and carrier:
- Sellers should contact the Supplier to confirm carrier details:
- (4) Which carrier will be used (FedEx / UPS / …)
- (5) Shipping method to the US (Ocean / Air)
- Shipping route options for the Seller:
- Ocean: 1–2 months
- Air: 1–2 weeks
10/ Review Quantity to send:
- Go back to step 4 and verify the unit quantity as follows:
- If an error is shown, it is because the Seller is using an SKU that was auto-generated by Amazon:
- Sellers should create their own SKU that is unique and unlikely to conflict
- If no shipment has been sent yet, open a case -> Amazon Support will ask you to create a new SKU/Listing
- If errors persist after several shipments -> Amazon Support will resolve the issue
Tất cả nội dung trên blog này chỉ nhằm mục đích cung cấp thông tin và chia sẻ kinh nghiệm cá nhân về kinh doanh trên Amazon. Eazyppc.com không đảm bảo bất kỳ kết quả cụ thể nào từ việc áp dụng các chiến lược hoặc thông tin được chia sẻ.
Việc kinh doanh có thể tiềm ẩn rủi ro, và mỗi cá nhân cần tự nghiên cứu, đánh giá trước khi đưa ra quyết định. Eazyppc.com không chịu trách nhiệm đối với bất kỳ tổn thất, thiệt hại nào phát sinh từ việc áp dụng thông tin trên blog này.


Chấp thuận Điều khoản & Chính sách
Trước khi tiếp tục truy cập website Eazyppc.com, bạn vui lòng đọc và đồng ý với: